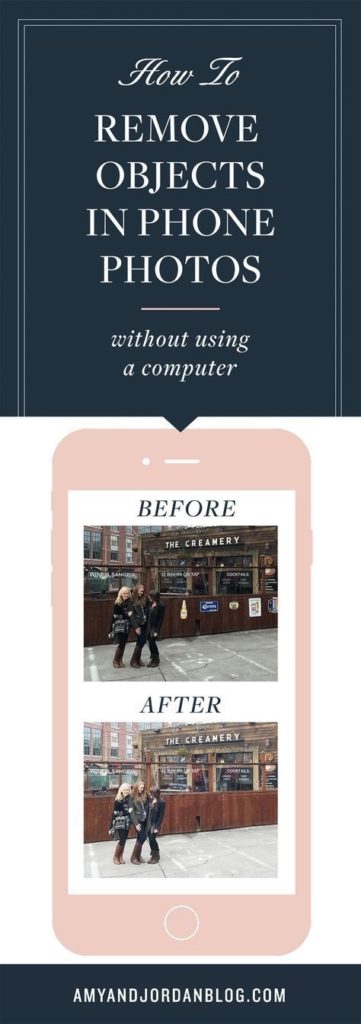
From the moment we met Natalie, we knew she was something special. She’s become a forever-friend for us. Natalie has such a big heart for helping others, and we love that even when she was facing one of the scariest things in her life, brain surgery, she was still putting other people first.
So when we heard we could help relieve a little bit of her stress by contributing to her blog while she’s recovering, we said “YES!†before she could blink 🙂
So who the heck are we?! We’re Amy and Jordan. We’re photographers who help other photographers love their photos, make more money and change lives. Before we were photographers, we were full-time elementary school teachers, and even though we’ve left the classroom, the classroom will never leave us. The only thing more fulfilling for us than reaching our own dreams of running a thriving creative business has helping other people reach theirs.
So today, we’re going to be sharing a quick and easy trick creative entrepreneurs can use to make sure their iPhone photos are still a great representation of their brand on social media.
If you know us, you know we love Instagram. Connecting with friends from all over the country (and even the world!) through pictures is just too fun. Maybe we’re little biased because we’re photographers, but a social media platform that’s dedicated to PICTURES is. our. jam. We share a ton of our professional work on our Instagram accounts, but we also love to share instant photos from our personal life taken with our trusty iPhones.
As creative entrepreneurs, we want to make sure that when people hit our Instagram for the first time that it makes a great first impression. To us, this means that our grid of images needs to have a clean, consistent, visually-appealing style, whether they were taken with a professional camera or an iPhone.
Sometimes we snap a photo we love from our phones, and there’s something in it that’s distracting our eye from appreciating the memory, but we still want to put it on Instagram.  And that’s where today’s post comes in. Whether you’re a professional photographer yourself, or a creative entrepreneur who doesn’t know the first thing about Photoshop, this tutorial is for you!
Today, we’re going to share our quick-fix secret: how to remove unwanted objects from your phone photos on the go, without using a computer. You don’t have to know anything about Photoshop (or heck, even own Photoshop!) to help clean up your images for social media.
Here’s a little screenshot example of Amy’s Instagram grid. Today, we’re going to pay attention to the one on the bottom right of the grid (taken with an iPhone).

We thought this would be an extra fun example since you probably recognize that cute girl in the middle!

Here’s the original photo straight out of the phone:

AH!! Notice anything different? Besides the edited photo being much lighter (which we can teach you how to do in THIS POST you’ll notice the one Amy posted is CLUTTER-FREE! No beer advertisements to be found! The eye sores all along the gate are gone, and it only took us a minute to do it! No Photoshop or computer required!

We LOVED this original photo because of the PEOPLE who are in it, which is why we wanted to post this shot in the first place. This was such a fun memory for us, but when other people look at it, we wanted them to notice the PEOPLE, and not be distracted by the eyesores on the fence. In fact, those unwanted objects were just begging to be removed!
So how did we do this? In one minute? While we were out and about roaming the streets of San Francisco?!
We pulled out our TouchRetouch app! It’s one of our favorite apps, and it’s only $1.99 in the App store!
Here are the steps you can take to do the same thing whenever you have a cell phone photo you love, with an eyesore you don’t:
- Open the app and click “open from gallery.†Select the photo you want to use.
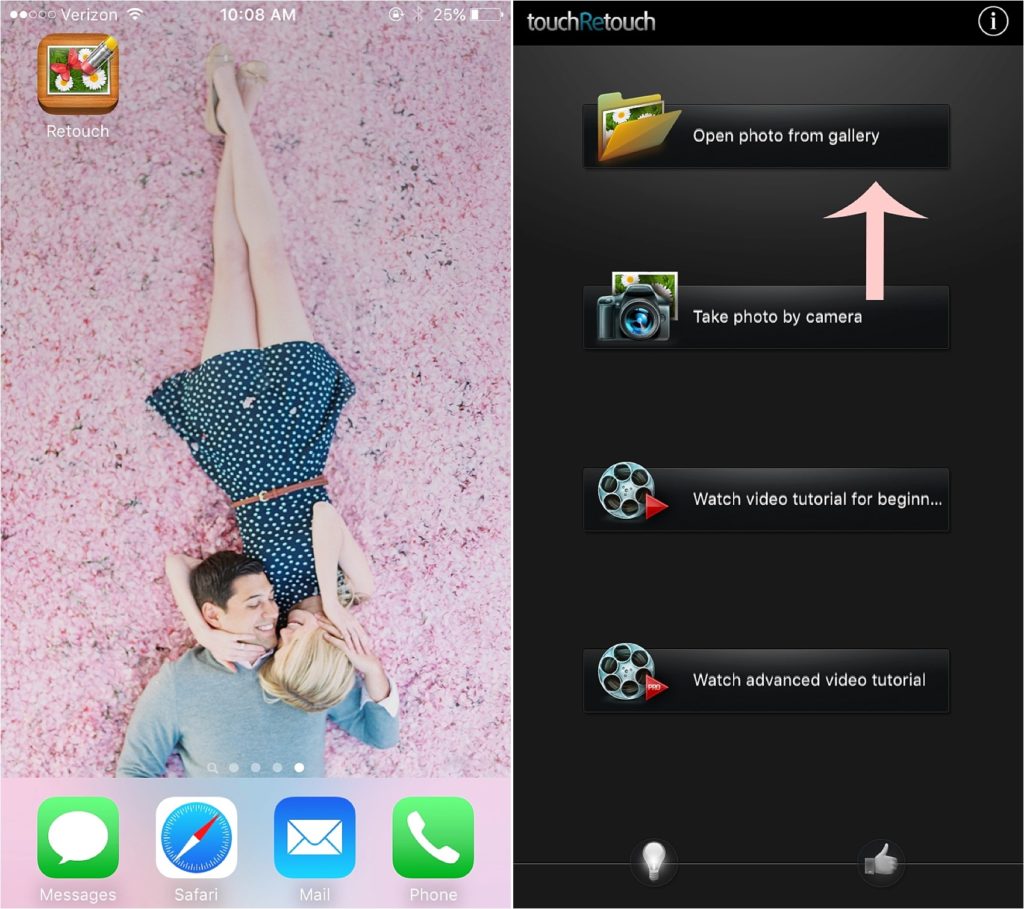
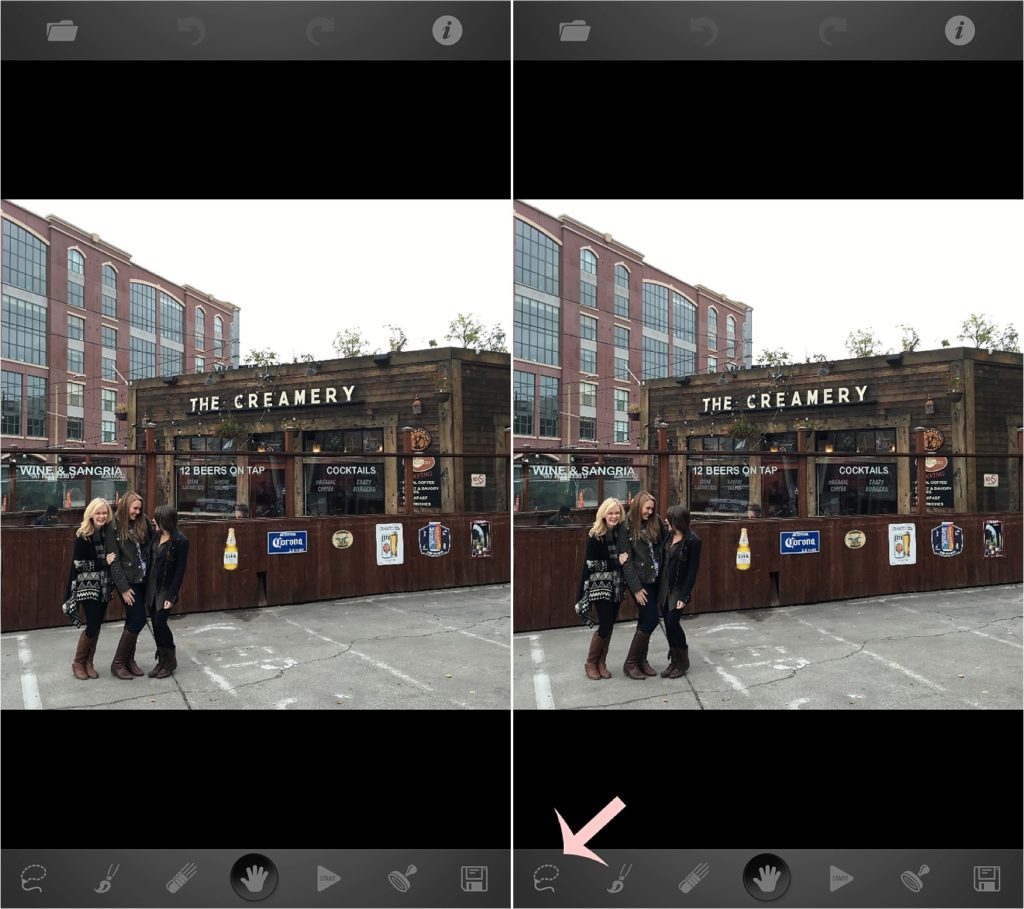
- Once the photo has loaded in, select the lasso tool in the bottom left corner.
- With the lasso tool selected, zoom in on the part of the image that has the eyesore. Use your finger to draw a circle all the way around the object, until the circle is closed.
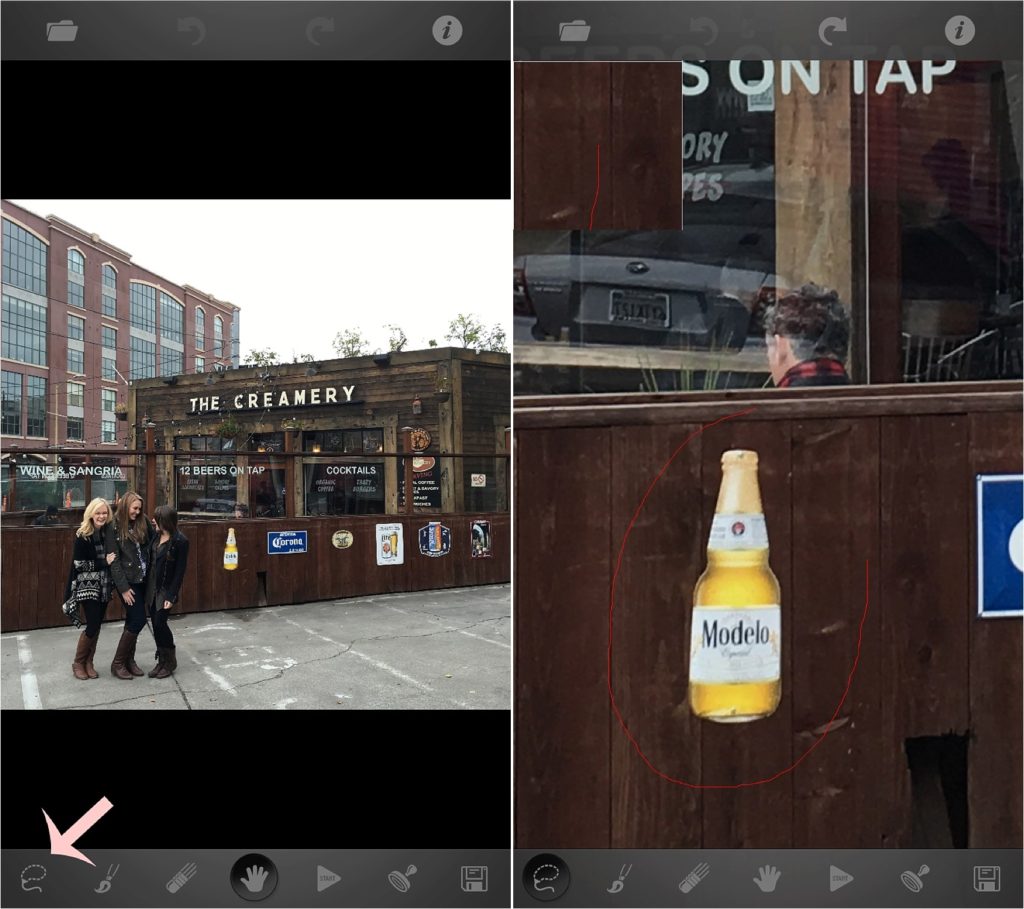
- Once you connect the circle with your finger, it will automatically fill it in and turn it red. That’s when you select the “play†button, and let it work it’s magic! Boom! Goodbye, eyesore!
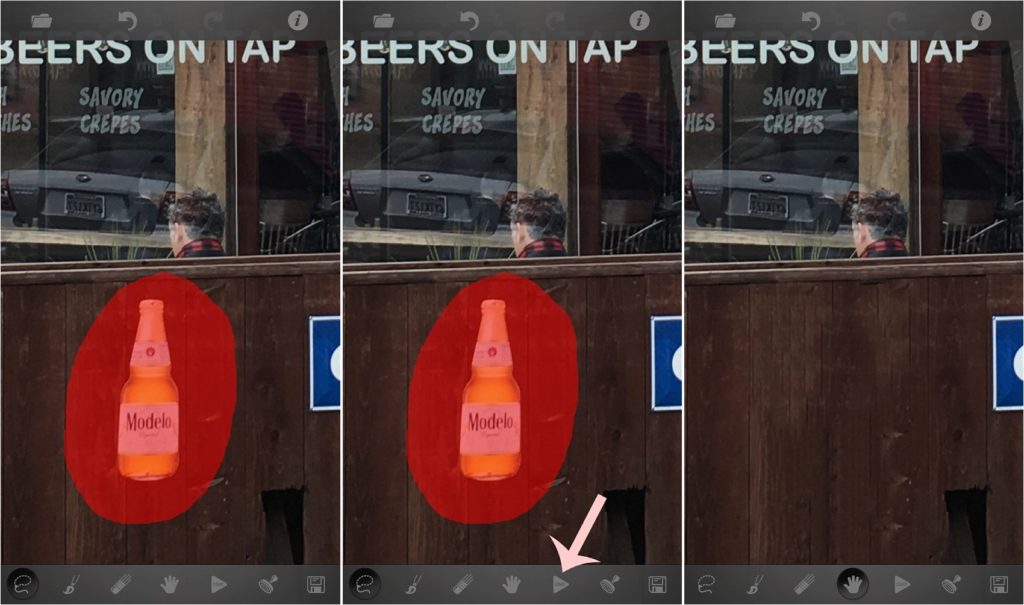
- Repeat this process (if necessary) with any other major eye sores in your image. In our case, all the advertisements on the fence are gone now (woo hoo!) and we’re ready to save it using the “save†icon in the lower right corner.
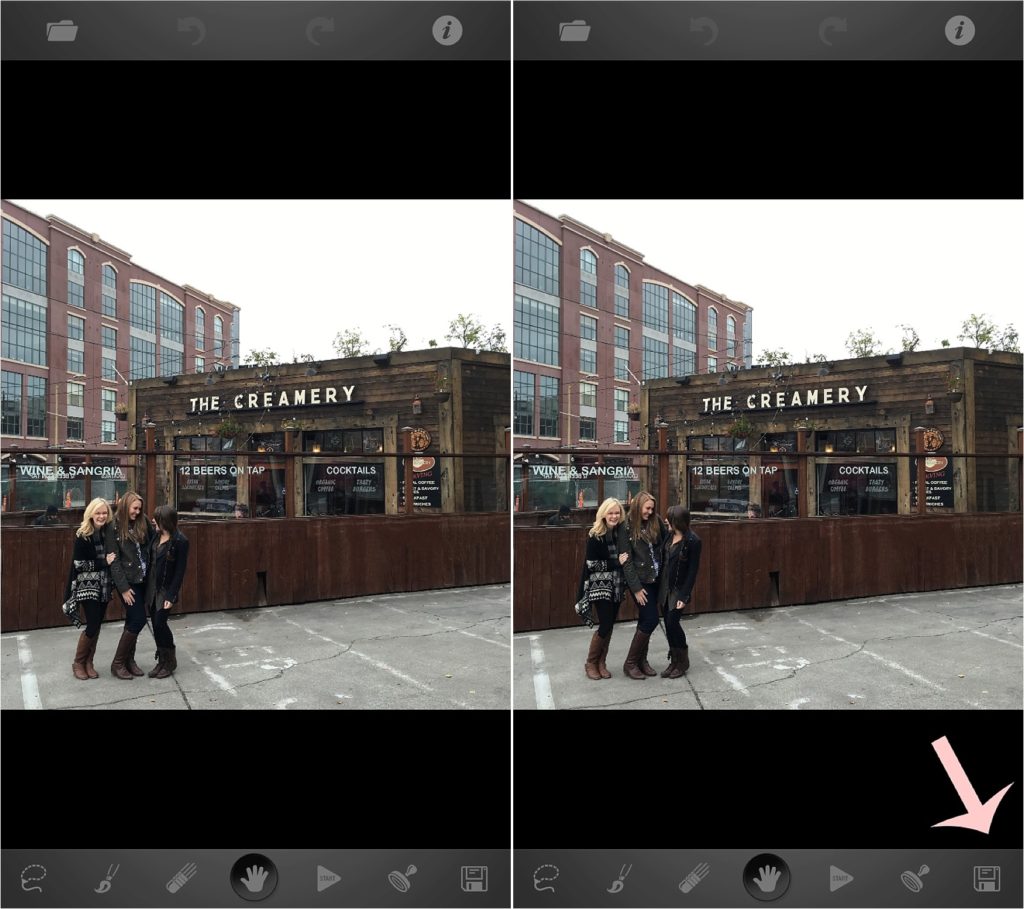
That took all of one minute to complete! Now, of course, just like with any photo editing software, it’s not always going to be perfect. You’ll get the best results when trying to remove an object that has clean, unaffected pixels around it.
If you really want to get fancy with it, you can even use the clone stamping tool (which is in between the play button and the save button) if the lasso tool isn’t cutting it, but let’s be real, when you’re trying to post a photo on the go, you want it to be as quick as possible! That’s why we didn’t spend ten minutes trying to take the words off the glass. Is it possible? YES! Is it practical? Not in our opinion! Our goal was an iPhone photo that was clean enough so that your eyes would go to the people. We’d say mission accomplished!

We hope this tip will make posting your cell phone photos on the go a little more fun!
If you want to know more about how we shoot and edit our professional photos, we have a free class for you! Just click here to watch: Shoot Better & Edit Faster!
 Bio: Amy and Jordan are photographers who help other photographers love their photos, make more money and change lives. They’re married high school sweethearts who started out as elementary school teachers who didn’t know anything about photography or business. They built their business from the ground up while working full time jobs and dreamed about going full-time doing the thing they loved –– which they eventually did –– building one of the most successful, thriving photography businesses in America’s fifth largest city and being featured in publications like People Magazine and Martha Stewart Weddings.
Today, they combine their expertise in education and their experience in the photography industry to teach online courses, where they’ve helped thousands of other photographers shoot better, edit faster and run thriving businesses. For them, the only thing more rewarding than living their own dreams has been helping other people reach theirs.
Leave a Reply Cancel reply
© 2023 Natalie Franke
/
/
/
/
/
